We buy our gourds from Welburn Gourd Farm in Temecula, CA. While it is a little bit of a drive from Anaheim, we're close enough to go to the farm so we can pick and choose exactly what we want. Saves on shipping bulky gourds, too.
While the farm has both cleaned and uncleaned gourds available, we typically save money by shopping the uncleaned gourds. They're so easy to clean that it seems silly to pay to have it done.
Here's a bottle gourd I'm going to be working on. It looks pretty ugly now, and it will look worse once I get it wet, but that will change quickly.
The easiest thing we've found to clean the gourds is an inexpensive steel scrubbing pad and plain water. How is that for a big difference?
For a simple cut to remove the top I like these coping saws. The teeth are fine enough that they don't chip the gourd. For a larger cut, say around the big end, we use mini hobby saw blades that fit in a wood handle.
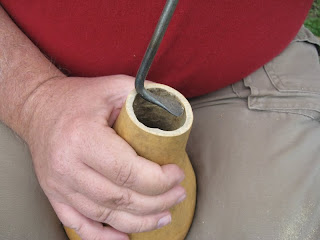
Cleaning out the seeds and pith can be a challenge without some tools to get down inside the gourd. I bought some mild steel rod at the hardware store, heated it up red hot in a propane torch, and then flattened the end with a hammer to make these two tools. The ends has been sharpened with a file. Two different angles can get just about anywhere inside the gourd. You can't see it in the picture but each of these has a simple wood handle. For smaller pieces like jewelry gourds I made a miniature set of these scrapers. These tools have saved us countless hours of frustration when cleaning gourds.
Man, I've got fat fingers.
Here's the crud you're trying to remove. It's a mixture of seeds and pith and whatever else takes up the inside of a gourd.
Once the inside is all scraped out and clean a 4-in-1 rasp works well to level off the top edge and generally clean up the inside of the neck.
That's pretty much the basics: Clean the outside, clean the inside, and then decorate in whatever manner suits your fancy.
Enjoy!
PS, Fayme just reminded me about this: some individuals can have an allergic or an allergic-like reaction to dust from the inside of the gourd when it is cut open or when cleaning it out. For safety sake, use an inexpensive dust mask so you won't have any difficulties with this. If you choose to not use a dust mask, and you start tasting the gourd in the back of your throat, stop what you are doing immediately and get a mask. Not every gourd I work on affects me in this manner, but if I taste the gourd and ignore it, I will have absolutely miserable sinuses for a few days.
Note that this is only when first opening the gourd and when cleaning out the interior. Once you get all the junk cleaned out this is no longer an issue.


2 comments:
Wow, thank you for this! I grew my first gourds this past season. Due to storage reasons, I only saved 9(had many). But my first one shakes seeds now, so I am hopefully going to make some birdhouses this coming spring.
I found your archery blog first. Funny- common interests!
Thanks for your comment!
We have tried growing gourds in out little apartment patio and have had pretty poor success getting the plants to fruit. Between that and the amount of space a gourd plant requires it's much easier for us to go to the farm to buy them. I'm envious that you've had such good results.
When you get working on your gourds in the spring I'd love to see what you do with them.
Post a Comment